blog
How I make my collages (part 2)

This time including all the stages!
27/04/2016
As promised a further step-by-step record of how I create my collages - this time trying to record how I build up the colours.

The physical collage I created at the life drawing session last Saturday...

... and the tonal drawing I made.

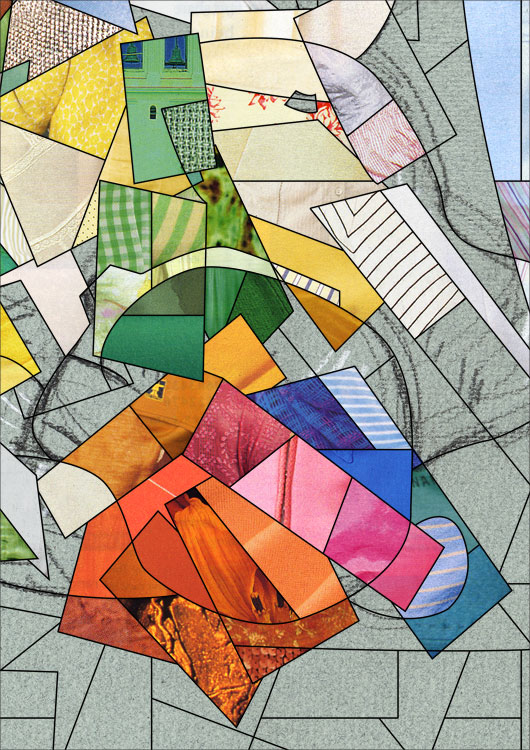
The drawing worked up in Illustrator

I've now imported the drawing to Photoshop from Illustrator. To make it easier to follow I've selected a detail of the drawing showing how I've superimposed it on the scan of the physical collage. After I drew over the physical collage on the computer, I shifted some of the elements which is why the drawing doesn't fully coincide with the scanned collage.
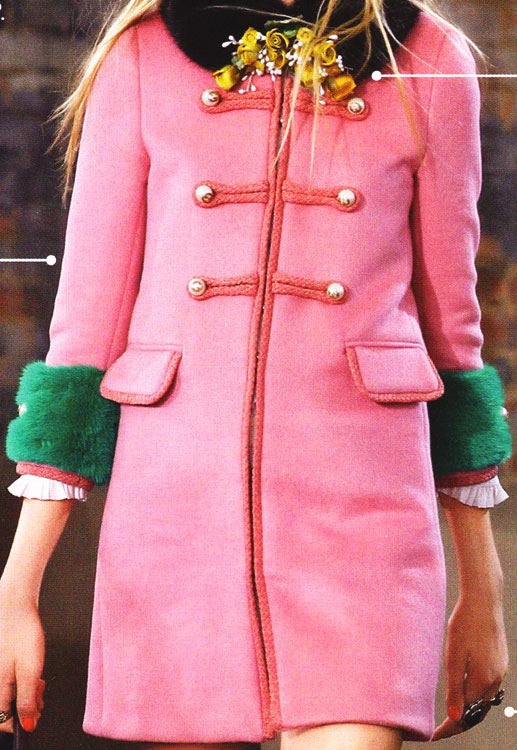
I have 50GB+ of scans of pictures cut from magazines. At this stage I'm trying to match the colours in the physical collage - if possible to find the scan of the cutting I've used in the physical collage. This is the scan of the pink cutting just below the centre of the detail.

I copy and paste it into the Photoshop file, move it if necessary and then delete everything of it except the filling of one of the cells from the drawing. (Breaking the drawing up into cells makes this very easy to do and I've automated a lot of the process).

I then work through the collage filling at least one cell over each element of the physical collage with as close a match as possible.

This is what it looks like overlaid on the tonal drawing. I will now use these colours as a reference while building up the collage - although there is likely to be a certain amount of adjustment as I go along, for example I'm not sure I will end up with green shadows in the hair and I may well need to adjust the tonal balance as the collage develops.

I've built up the collage a little further - at this point I decided to keep the colours of the original collage - for example the blue in the hair. I can always change it later - or produce two versions of the same collage.
I've now covered the original collage apart from the white areas and some parts of the background.

I've now covered the white areas too and am beginning to fill in the rest of the collage using the colours I already have as a guide. As I go along I make alterations to what I have already done - for example in the bottom left of this picture.

I have now finished the figure and am working on the background - and there are more alterations on the bottom left.

The area of my detail is now finished...

... not quite, a few more alterations on the extreme right.
And the whole of the completed collage is at the top of this post.
The physical collage I created at the life drawing session last Saturday...
... and the tonal drawing I made.
The drawing worked up in Illustrator
I've now imported the drawing to Photoshop from Illustrator. To make it easier to follow I've selected a detail of the drawing showing how I've superimposed it on the scan of the physical collage. After I drew over the physical collage on the computer, I shifted some of the elements which is why the drawing doesn't fully coincide with the scanned collage.
I have 50GB+ of scans of pictures cut from magazines. At this stage I'm trying to match the colours in the physical collage - if possible to find the scan of the cutting I've used in the physical collage. This is the scan of the pink cutting just below the centre of the detail.
I copy and paste it into the Photoshop file, move it if necessary and then delete everything of it except the filling of one of the cells from the drawing. (Breaking the drawing up into cells makes this very easy to do and I've automated a lot of the process).
I then work through the collage filling at least one cell over each element of the physical collage with as close a match as possible.
This is what it looks like overlaid on the tonal drawing. I will now use these colours as a reference while building up the collage - although there is likely to be a certain amount of adjustment as I go along, for example I'm not sure I will end up with green shadows in the hair and I may well need to adjust the tonal balance as the collage develops.
I've built up the collage a little further - at this point I decided to keep the colours of the original collage - for example the blue in the hair. I can always change it later - or produce two versions of the same collage.
I've now covered the original collage apart from the white areas and some parts of the background.
I've now covered the white areas too and am beginning to fill in the rest of the collage using the colours I already have as a guide. As I go along I make alterations to what I have already done - for example in the bottom left of this picture.
I have now finished the figure and am working on the background - and there are more alterations on the bottom left.
The area of my detail is now finished...
... not quite, a few more alterations on the extreme right.
And the whole of the completed collage is at the top of this post.
Comments (click to expand)